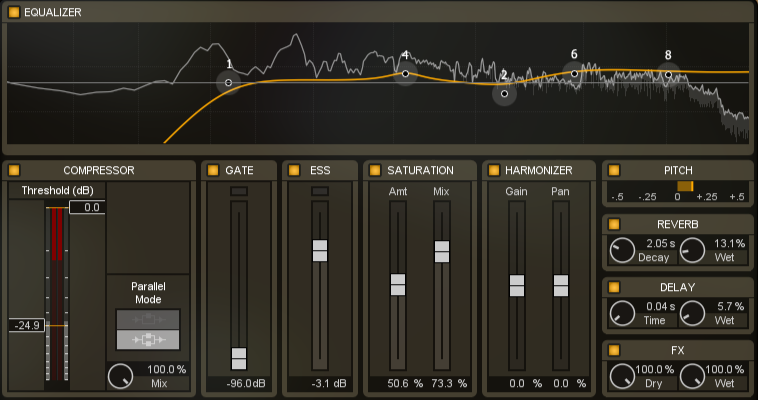
Nectar 2’s Overview Panel gives you instant access to the most relevant settings of many of Nectar’s modules. Use the Overview Panel for a quick glance at a preset’s settings or for quick tweaking of modules to adjust them to suit your vocals.

Start by selecting a Genre and Preset by clicking the large display at the bottom of Nectar’s interface. From here, you can adjust your settings to taste.

Nectar’s Overview Panel View presents you with the most relevant controls for each of Nectar’s modules. You can engage or bypass processing in the different modules by using the power buttons in the upper left corner of each block in the Overview Panel.

Within the EQ section of the Overview Panel you have the ability to interact with all enabled nodes from the EQ module. Adjust any of Nectar's EQ nodes in order to shape your vocals to fit your mix. Click and drag to alter the frequency and gain of any node and use the node brackets or the mouse-wheel to adjust the Q of that particular node. The Equalizer section also features a spectrum analyzer. Learn more about interacting with these EQ nodes in the EQ Module section here.
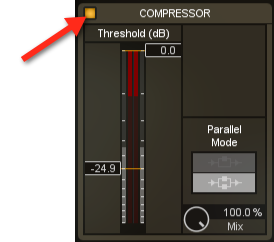
The Overview Panel allows you to instantly adjust the most commonly adjusted settings within the Compressor module. Learn more about the settings described below in the Compressor Module section here.
Threshold Controls
Controls for both the compressor’s thresholds are displayed alongside an input and gain reduction meter. The threshold control sets the level at which the compressor will begin to affect the incoming signal.
Parallel Mode
These modes determine whether Nectar uses just one compressor and the dry signal routed in parallel or two independent compressors routed in parallel.
Mix Control
The mix control determines how much signal is sent to the first compressor versus the second compressor or the dry signal (depending on the Parallel Mode you have selected). In the first Parallel mode (one compressor in parallel with the dry, uncompressed signal), a setting of 100% blends no dry signal with the compressed signal and a setting of 0% completely bypasses the compressor. In the second parallel mode (two compressors) a setting of 100% routes all of the signal to the first compressor and a setting of 0% routes all of the signal to the second compressor.
You can raise the Threshold of Nectar's Gate in order to reduce the gain of any low level signals in your audio like room tone. It takes program material below the threshold and reduces it by a factor determined by the ratio. Learn more about the settings described below in the Gate Module section here.
Threshold Slider (dB)
The Threshold slider sets the level where the Gate processing takes place. As the threshold is increased, more of the signal will be reduced.
Nectar’s De-Esser is a powerful tool for controlling sibilance on vocal takes. By applying the same amount of Ess reduction regardless of the incoming audio level, Nectar’s De-Esser allows you to transparently reduce sibilance, no matter how dynamic your vocal take is. Learn more about the settings described below in the De-Esser Module section here.
Ess Slider
The Ess slider controls the amount of gain reduction that is applied to the incoming vocal take by setting a threshold at which detected sibilance is attenuated. This gain reduction is applied quickly and transparently to the entire incoming vocal take instead of simply reducing the gain of a particular set of frequencies, allowing for much more natural sibilant reduction.
Nectar’s Saturation module can add rich harmonics to your vocals, recreating the sounds of tube circuits and tape recordings. Breathe new life into a vocal recording giving it instant sparkle or a subtle gritty edge. Learn more about the settings described below in the Saturation Module section here.
Amount Slider
The amount slider controls the amount of drive in the saturation or how pronounced the added harmonics will be.
Mix Slider
The Mix slider allows you to blend dry (unsaturated) signal with wet (saturated) signal to get the perfect amount of warmth while retaining the qualities of the original recording. A setting of 100% will be purely saturated without any blended dry signal while a setting of 0% will add no saturated signal at all.
Nectar 2’s Harmony module allows you to quickly add harmonized vocal accompaniments to your vocal tracks without multiple performers or tracking passes. In addition, the Harmony module functions as a Doubler allowing you to add up to four voices to recordings. Learn more about the settings described below and the Harmony module here.
Gain Slider
The Gain slider determines the levels of the added voices produced by the Harmony module in relation to the original lead voice.
Pan Slider
The Pan slider affects the stereo width of the added voices produced by the Harmony module. Lower settings make the location of added voices more narrow while higher settings spread the stereo location of the added voices.
Nectar’s Overview Panel features a meter that reflects the amount of pitch correction processing taking place in real time. This meter is enabled only when you’re using the real-time Pitch Correction module. Learn more about the Pitch Correction module here.
Nectar’s Plate Reverb module allows you to instantly add a warm depth to your vocal tracks reminiscent of timeless recordings. Learn more about the settings described below in the Reverb Module section here.
Decay
The Decay control corresponds to the physical damper present in the EMT 140. While not an explicit control of reverb time as often seen in digital reverbs the control will affect the overall decay of the reverb.
Wet
The Wet control affects how much wet (reverberated) signal will be blended with the dry (not reverberated) signal. A setting of 0% will add no reverb while a setting of 100% will add reverb to all of the incoming audio.
Nectar's Delay module can help to create transparent or colorful delayed copies of your original vocal track. Learn more about the settings described below in the Delay Module section here.
Time
Determines the amount of time that will pass before each successive repeat of your incoming dry vocal.
Wet
The Wet control affects how much wet (delayed) signal will be blended with the dry (not delayed) signal. A setting of 0% will add no delay while a setting of 100% will add delay to all of the incoming audio.
Nectar's FX module allows you to create both otherworldly and subtle vocal sounds with distortion, modulation, and time-based effects. Learn more about the settings described below in the FX module section here.
Dry
The Dry control affects how much dry (unaffected) signal will be blended with the wet (affected) signal.
Wet
The Wet control affects how much wet (affected) signal will be blended with the dry (not affected) signal.